Week #2 Summary Post

Andrew Todd Marcus
1 / 9

Hello everyone-

For your weekend assignment, please do the summary post as you did last weekend, be sure to add any photos, videos, gifs, sketches or precedents you may have gathered today.

Assignment:

The purpose of this post is to synthesize and document your progress for your most recent classes. You will complete this every weekend or as instructed by your coach. This is not merely a report of what you’ve done but an analysis of your work culminating in a clear statement of your direction for the project.  You must include todays documentation in this post. This homework should take ~1 hour to complete.

  • Post 5-10 images from this recent blog posts and clearly title and caption each one. This should include precedents, sketches, and photos of your work.
  • Write an a process Project Description. This briefly describes the Soul and Body of your project and what you are trying to achieve with your idea. If you have more than one idea you are working on describe them all.
  • Discuss where you began, how you progressed, and where you ended this week working on your project in terms of its :
    • concept/idea 
    • technical aspects
    • Fabrication progress
  • As part of the discussion, reflect on the feedback you received from coaches and the design decisions you made based on this feedback. You will have multiple simultaneous paths, write about them all. Relate this discussion to specific images you posted, by title of the image.
  • Discuss how your decisions relate to your project idea and indicate if you changed your idea and why. We want to know how the work you did this week supports your overall project goals. Be specific.
  • What portions of your idea/project still need to be figured out? Describe your next immediate steps and what you plan to work on early next week.


The Brief - Part 1 - Outline and Brief draft

Andrew Todd Marcus

Please upload your completed Outline + Draft Brief  by Friday morning


The Brief - Part 1 - Outline

As part of your portfolio for each studio, you will be asked to write a Brief for your project. The Brief is a written piece that will accompany your presentation and is a strong narrative that ties together the Why, How and What of your project through clear, cogent writing. It tells the story of how your idea was born, developed, and manifested.

------Copy & Paste this section below into a new post and answer ALL of the questions completely ---- 

The Brief Part 1 - Outline

Answer the following questions in full, complete sentences. Title the post "Brief Outline" and post it in the Writing Tab of your Project. Every student must do this assignment. Cut and paste the assignment below and write your answers below each point. You must respond to ALL items (#4 can be skipped if there is no individual client). Click Shift-Return to start a new line.

  1. Write a A 1-2 sentence project description. This description should not include the name of the project and should be written in the third person. 
    1. What is the "soul" of your project? Describe the idea of the project in conceptual terms. This should paint a conceptual picture in the readers mind. (1 sentences)
    2. What is the "body" of your project? Describe the basic technical or physical construction of the project. This should NOT go into excessive detail, just provide an overview. Describe the project to someone with no technical knowledge in as few words as possible. The reader should be able to envision what the project looks like. ( sentences)

      Examples:
      Night Light Blankie: A child's sensory blanket that provides comfort and privacy in the high stress environment of the hospital using weight, textures, and light. The blanket transforms into a mini light up fort over a child’s head.
      Cocoon: a shroud that explores human spirituality and the concept of life after death through the use of repetitive religious iconography. Composed of over 300 pieces of laser cut balsa wood lined with space tape, the icons are arranged using a mathematical strange attractor.
  2. Why does your project exist? The why explains how your project changes the world. It is the reason your project exists – 
    1. What social issue does your project engage? (1 sentence)
    2. Who is your project helping?  (1 sentence)
    3. How does the project change the world? This can be in a simple physical way or in a complex social way. (1 sentence)
    4. What important social, intellectual, or technical questions does it raise? (1 sentence)
  3. Who is the project for? Who will use it and in what context (1 sentence)
  4.   If you are designing for a specific person, answer the following:
    1. What is the client's name and what is their medical condition, if any? (1 sentence)
    2. How does their condition relate to your project? Include concise and compelling information about the client you are working with, their condition, and how that relates to your project design. (1 sentence)
    3. What is their personality like and how does it inform your design process? (1 sentence)
  5. How does your project work. In non-jargonistic language, answer the following 
    1. What is the basic technology behind your project? (1 sentence)
    2. What is technically innovative about your project? How does it differ from existing technology? (1 sentence)
    3. How does a user physically and mentally interact with the project? (1-2 sentences)


Now that you have created a document that outlines all of the information you want to relate in the Brief, it is time to weave that information together into a strong narrative that ties together the Why, How and What and Who of your project through clear, cogent writing. Tell the story of how your idea was born, developed, and manifested.

Create 1 post titled “The Brief” in the Writing tab with text that includes the following 2 items, numbered:

  1. A 1-2 sentence project description for your transcript. This will serve as the basis of the Project Description that appears in your transcript. This description should not include the name of the project and should be written in the third person. This was Question 1 in your Outline.
    examples:
    Night Light Blankie: A child's sensory blanket that provides comfort and privacy in the high stress environment of the hospital using weight, textures, and light. The blanket transforms into a mini light up fort over a child’s head.
    Cocoon: a shroud that explores human spirituality and the concept of life after death through the use of repetitive religious iconography. Composed of over 300 pieces of laser cut balsa wood lined with space tape, the icons are arranged using a mathematical strange attractor.
  2. A 1-2 paragraph brief for your project based on the description below. This will be based off the information you put together in your Outline and should focus on style. The NuVu writing coach will give you feedback and you will have the opportunity to revise this text before the final presentation. The primary purpose of The Brief is to explain, entice, and convince the reader that your project is amazing and important. Imagine your project on display in the Museum of Modern Art. The Brief is hanging on the wall next to your work. In 1-2 paragraphs, a viewer should understand what your project is, why it exists, and howyou made it, and who it is for. More importantly, the viewer should be interested and care. You will draw them into your project through a compelling narrative.

    Things to think about:
    • Use the information in your Outline. Do not simply put all of the answers together -- you must weave it together into a clear story.
    • The what is a clear statement of the thesis or problem+solution. Your project description for your transcript (#1 above) can be adapted for this purpose.
    • The why explains how your project changes the world. It is the reason your project exists – what social issue is it engaging, who is your project helping, how does the project change the world, and what important social, intellectual, or technical questions does it raise? The scope of the why can vary widely.
    • The how briefly explains what technical prowess, innovative methods, or cool materials you used in your solution.
    • The who explains who will use your design, why they will use it, and in what context.
    • Think of the reader - it is good to imagine that a college admissions officer AND a potential employer in the field of your design should both be able to understand and be excited by the project based on your writing.

Write in the Third person in an explanatory fashion. Resist using I, WE, OUR, or YOU and focus on describing the work.

Here is an example from Penelope the Pain-O-Monster:

Pediatricians and other doctors find it challenging to collect accurate self reported information from children about their level of pain due to lack of communication skills, fear, anxiety, and discomfort. Traditional 1-10 pain scales do not fully address these issues, often leading to uncomfortable children and inaccurate symptom information. Penelope the Pain-O-Monster is a cute plush toy that uses integrated pressure sensors to allow children to express their source and level of pain through play.

A previous project, The EmoOwl, helped children with autism to express themselves by translating motion into color. Penelope the Pain-O-Monster grew out of the desire to expand children’s health menagerie with a different stuffed animal, one that makes the pain charts patients use to express their pain more interactive and easier for a child to use. Because research has shown that playing with stuffed animals can take children’s mind off pain, an additional “Fun” mode was added to distract from pain and anxiety. The handcrafted stuffed animal uses force sensors in different body parts that light up from blue to red depending on how hard they are pushed to show the child’s pain level. The hope is that, as one of many future healthcare friends, Penelope can help sick children feel safer while providing more useful information to care providers.

Weekly Summary Post

Andrew Todd Marcus
1 / 13

Assignment:

The purpose of this post is to synthesize and document your progress for your most recent classes. You will complete this every weekend or as instructed by your coach. This is not merely a report of what you’ve done but an analysis of your work culminating in a clear statement of your direction for the project.  You must include todays documentation in this post. This homework should take ~1 hour to complete.

  • Post 5-10 images from this recent blog posts and clearly title and caption each one. This should include precedents, sketches, and photos of your work.
  • Write an in process Project Description. This briefly describes the Soul and Body of your project and what you are truing to achieve with your idea. If you have more than one idea you are working on describe them all.
  • Discuss where you began, how you progressed, and where you ended this week working on your project in terms of its :
    • concept/idea (Main focus this week)
    • technical aspects
    • Fabrication progress
  • As part of the discussion, reflect on the feedback you received from coaches and the design decisions you made based on this feedback. You will have multiple simultaneous paths, write about them all. Relate this discussion to specific images you posted, by title of the image.
  • Discuss how your decisions relate to your project idea and indicate if you changed your idea and why. We want to know how the work you did this week supports your overall project goals. Be specific.
  • What portions of your idea/project still need to be figured out? Describe your next immediate steps and what you plan to work on early nest week.


Example:

The Slime Shade

Thesis: The Slime Shade is a living window shade that supports sustainability through an integrated home bioreactor. It provides solar heat gain reduction and generates biofuel  in the home through the use of active algae production in a complex heat-sealed ecosystem.

We decided to continue with the Slime Shade project and want to focus on improving the environmental conditions for growth through further development of the habitat as well as improving on the aesthetic design and figuring out how to both transport and draw off algae for biofuel.

We began by growing a small sample of algae so that we can collect some data over the course of the studio on its growth rate. Tim gave us feedback on ideal growth conditions and we wanted to try things out in a controlled environment.

In our previous version we struggled with meeting aesthetic, mobility, and habitat requirements for the actual shade and wanted to address these issues first. We looked at various shade designs and discussed what types of patterns would meet all three criteria. We felt like corners would trap a lot of algae so we may want to avoid 90-degree angles and began working with hexagons. We also talked about whether the shade itself should be at a constant pressure versus a model system that uses solenoids and can have inter-changing parts. We are leaning towards a modular system. Andrew offered some feedback about pooling and ease of raising and lowering shades, so we began exploring how cutting edges of the hexagons could make things move more smoothly, both in terms of fluid flow and raising and lowering the shade.

Simultaneous with exploring shade patterns, we began to investigate how we would seal the plastic as this was a major hindrance in our original design. We began by modifying a soldering iron with a steel ball roller to allow for more precise control.  We found that the all-steel roller bearing did not heat up sufficiently and ordered an aluminum roller which we thought would work better. We also wanted more control over the roller and Tim suggested that we use try to create an attachment for the CNC mill that would let us have computer control. We made a new prototype of the sealer. We tried brazing the metals together, but stainless and copper don't like each other so they didn't bond. We then blasted it into submission with the welder. It also didn't work well because the stainless is so thin, but it kinda stays together so it's good enough.We designed the CNC attachment to fit inside the dust collector shroud and to allow for even pressure without breaking. When the roller arrived, we tested our system on the CNC. After a few tries it worked great. We created a sample flow pattern and filled it with algae and it held!

All of our work is supporting our original idea. Now that we have the CNC attachment, we need to go back to refining the geometry of the shade and optimizing for ease of raising and lowering and algal growth. We also need to begin looking at the overall design and the pumping systems. On Monday Stefani will begin the pump redesign and Nathan will continue to work on the patterning. 

In order to finish the project we need to finalize the pattern, decide if the shade moves (and figure out how best to do it - automatic or manual), completely redesign the frame and pump system, figure out how to get the algae out and what to do with it, run the pattern through the CNC, hook everything up, and put it all together! That is overwhelming! I am not sure if we will be able to address the biofuel extraction, but that may we able to be done in another project. We might be able to simplify things - it could be that the shade does not need to be raised or lowered at all! 

Working with Sensors

Spyridon Ampanavos
minMax.ino
smooth.ino

NeoPixel LED Strip

Liam Brady

LED Strips are individually addressable ribbons of RGB (red green blue) lights, meaning that each light on the ribbon can be controlled by itself and give off any color on the visible color spectrum. Every light on the strip has its own chip onboard that processes commands given to it by the Arduino.


NeoPixel Library

#include <Adafruit_NeoPixel.h>

Adafruit_NeoPixel strip = Adafruit_NeoPixel(30, 6, NEO_GRB + NEO_KHZ800);

void setup() {
  strip.begin();
  strip.show();
}

void loop() {
  for (int i = 0; i < strip.numPixels();  i++) {
    strip.setPixelColor(i, strip.Color(255, 0, 0));
  }

  strip.show();

  delay(100);
}

OCDevice

Jake Monahan and Cameron Maalouf

A relaxation and therapy device for people with OCD, which encourages them to accept disorder for a certain period of time.

Current so-called “solutions” to OCD don't really address the true problems of obsessions and compulsions, instead behaving as fidget toys and puzzles. We needed to create a device that could provide the relief of creating order and symmetry as well as allowing the user to push themselves to cope with disorder for as long as they choose. The OCDevice is a rectangular prism containing a grid of lights that can be organized or disorganized depending upon the user's decision.

There isn't a product yet which deals with these problems, however OCD is an condition that needs to be addressed with more attention than we as a society have been currently giving it. We need to eliminate stereotypes that OCD is merely about cleanliness and neatness. OCD is a set of different obsessions and compulsions. One of these compulsions is a need to put things in a specific order as well as using repetitive motions. Which is where our product comes into play. The OCDevice starts off as a disorganized grid of random colors, however by making the repeated motion of pressing the buttons on the side, the grid slowly becomes organized. While the cube is disorganized, a stopwatch is active to show the user how long they have gone without organizing, to set a personal challenge.

Installing Rhino

Andrew Todd Marcus

Installing Rhino

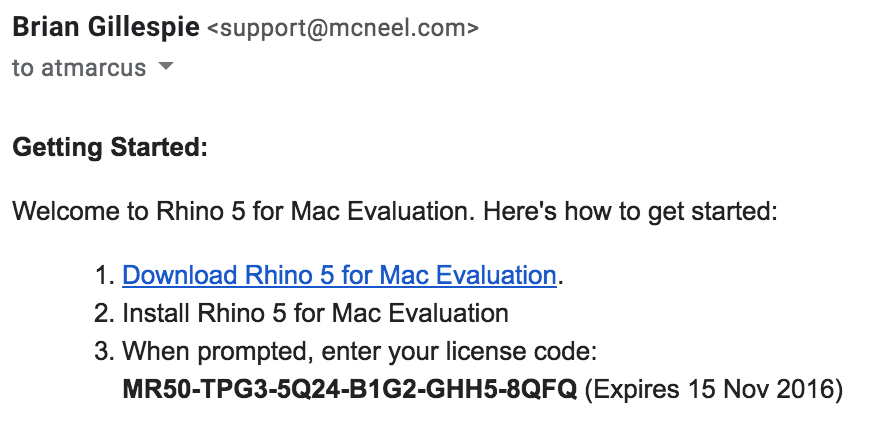
NuVu users Rhino5. The trial version will function fully for 90 days in trial mode.

Download Rhino

Enter your email in order to download the program.

You will receive an email with license information.

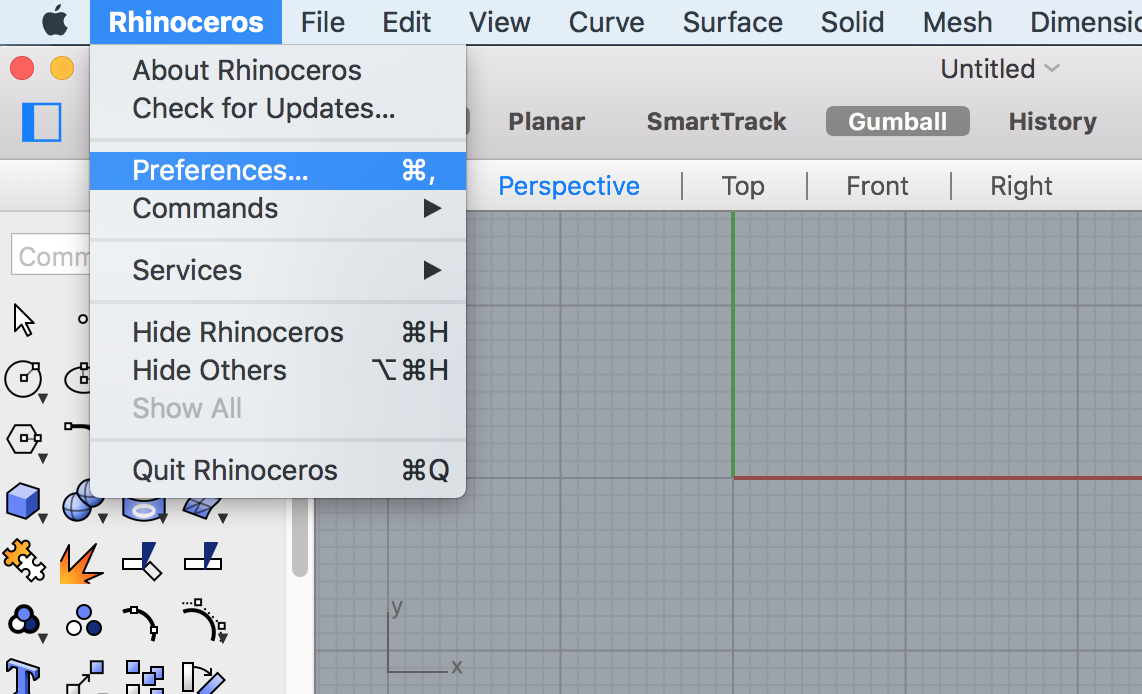
In Rhino, go to Preferences (or Options on a PC)

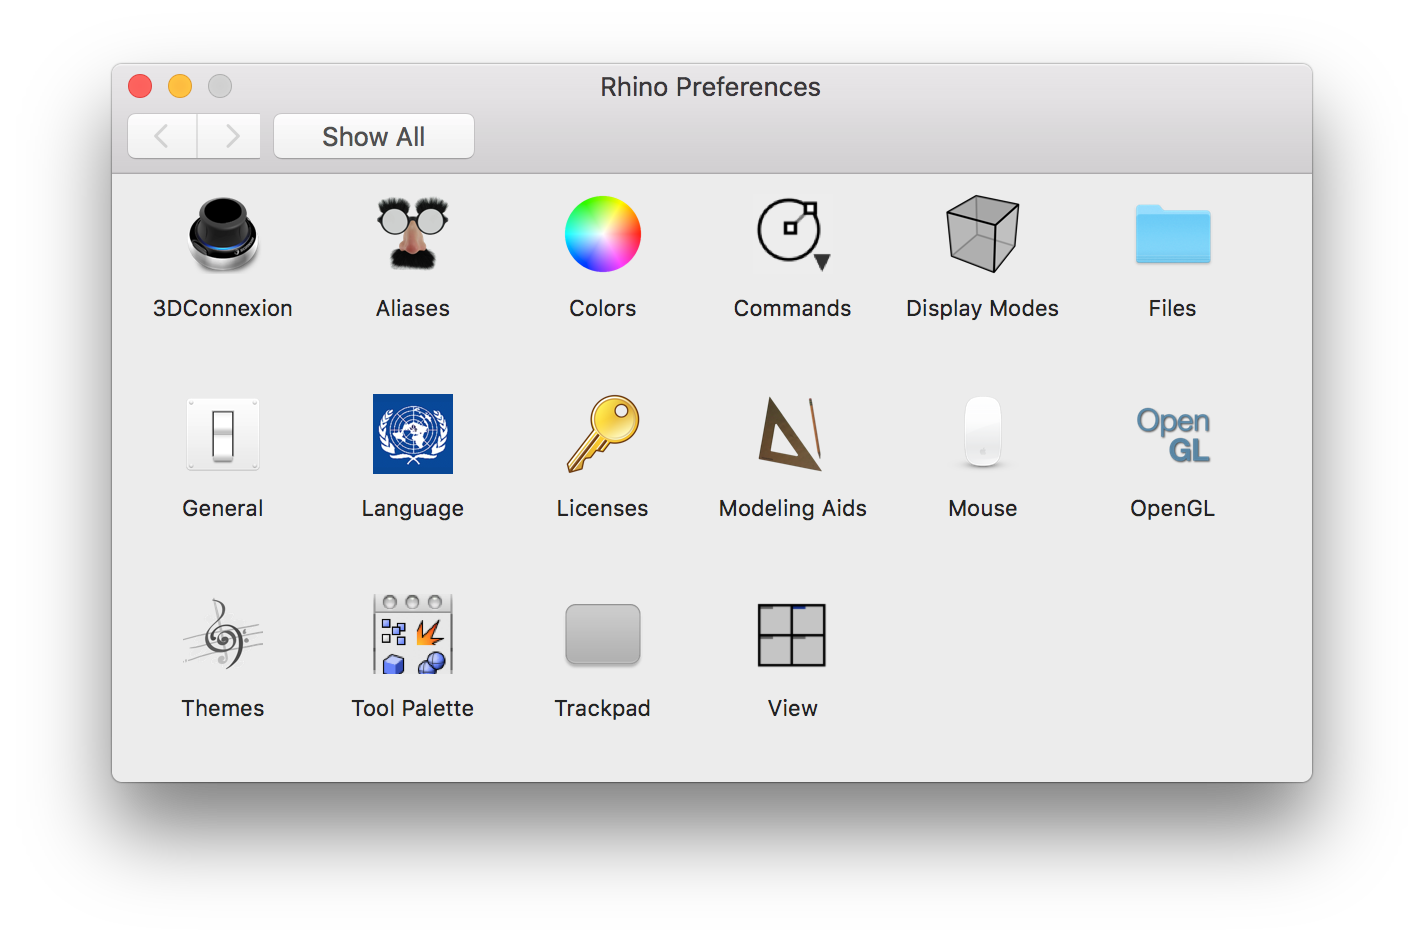
Select Licences

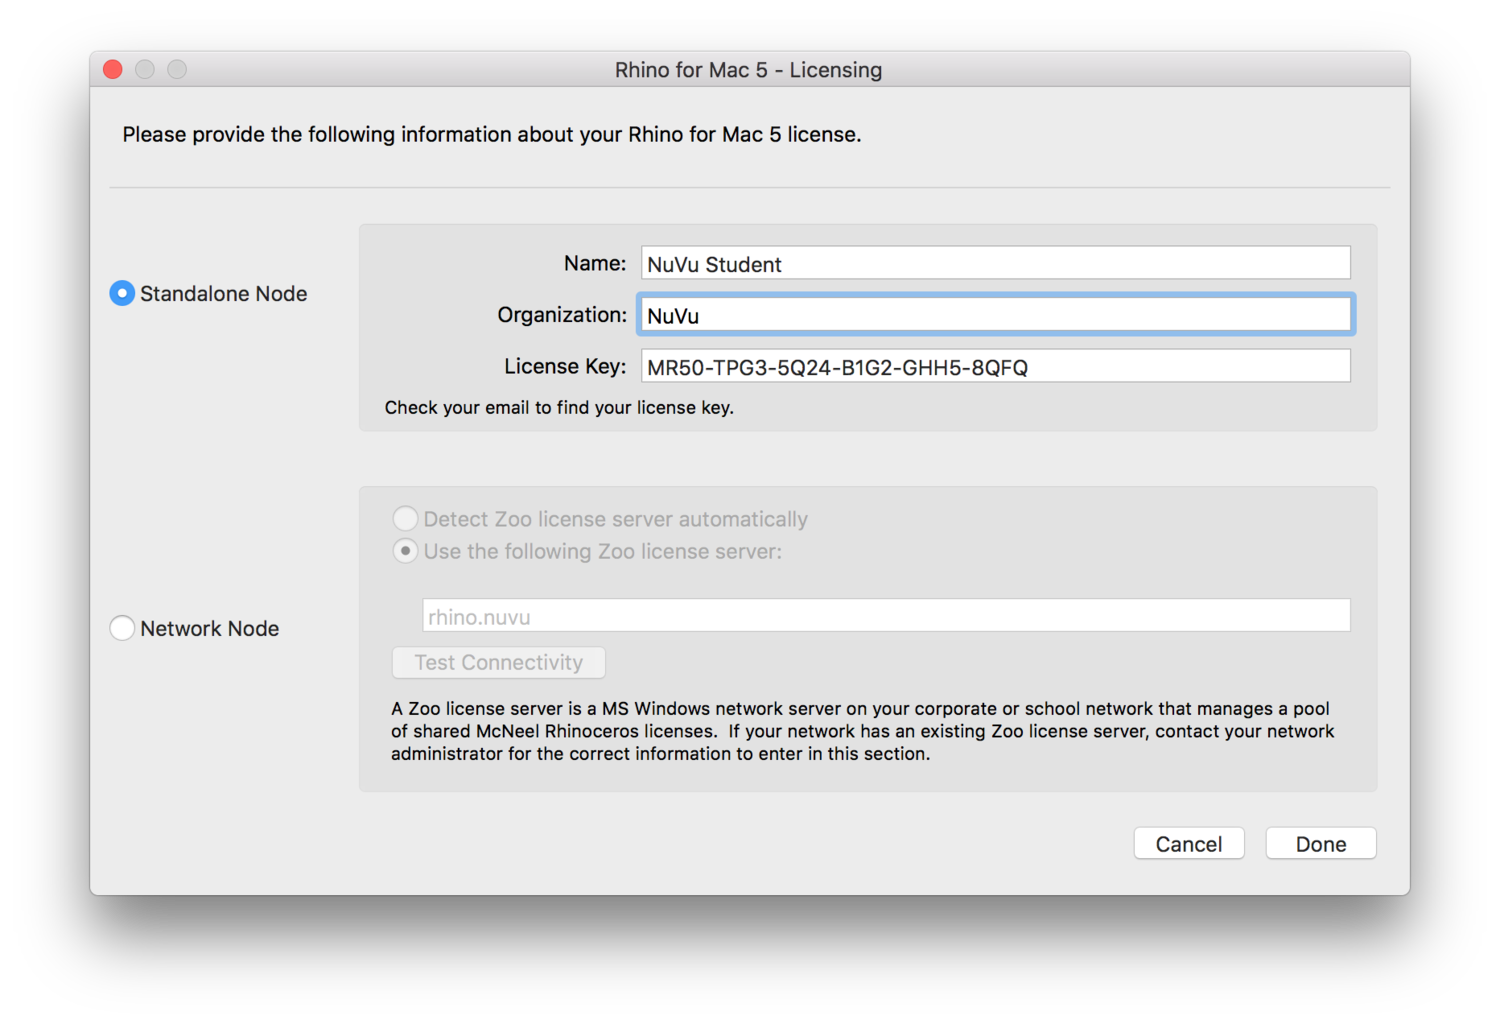
Copy and paste the information provided to you in the email

Click Done. You are good to go for 90 days!

Butterfly woman

Meggee Joseph and Alec Perez-Albuerne

The Butterfly Woman project is a wearable set of wings for Lydia Villa-Komaroff, a molecular biologist that works with under-represented groups of people supporting their efforts in the STEM fields. The wings are designed to incorporate her dedication to eradicating bias and stereotyping with her interest in Geiger Counters and butterflies. The wings serve as a detector of Implicit Bias and Stereotyping and flutter when this type of negativity is detected.

When the wings flutter they alert both the wearer and the exhibitor of the bias to of the situation and what specific type of stereotyping is occurring. Lydia often wishes that she was able to seek out any and all stereotyping and bias around her, even in the most subtle situation. This project allows Lydia to go about her business without diverting energy towards seeking out bias. It will alert her to any nearby bias so she can act immediately helping others grow and protect themselves from stereotyping and its harmful effects. The wings, two and a half feet tall, are mounted onto an exoskeleton that fits like a corset around the user's body. A user-activated motor attached to the back of the exoskeleton drives the fluttering motion of the wings. 

The goal of designing this real-world superhero prop is to bring awareness to the subtle expression of modern-day racism through implicit bias. For example, when the most challenging jobs are given to male workers when the female workers are more qualified but are excluded due to their sex. On a daily basis, the project succeeds just by bringing smiles and positivity into Lydia's life and the lives of those around her. The structure and lighting elements were designed to be fun and interesting to observe. The wings are specifically designed to represent Lydia's personality. The material the wings are made out of is thick, symbolizing Lydia's resilience in the face of adversity. Underneath the thick material, colorful lights represent her fun and playful personality once people get to know her.

the crown of truth

Talia Fellman-Blau and Shiylin Williams